Un'Goro Crater Devilsaur Leather Farm (48–55)
A devilsaur leather farm around the Un'Goro Crater rim for levels 48–55: stegodons first, Dreamfoil and Thorium at the walls, then the three devilsaur patrols.
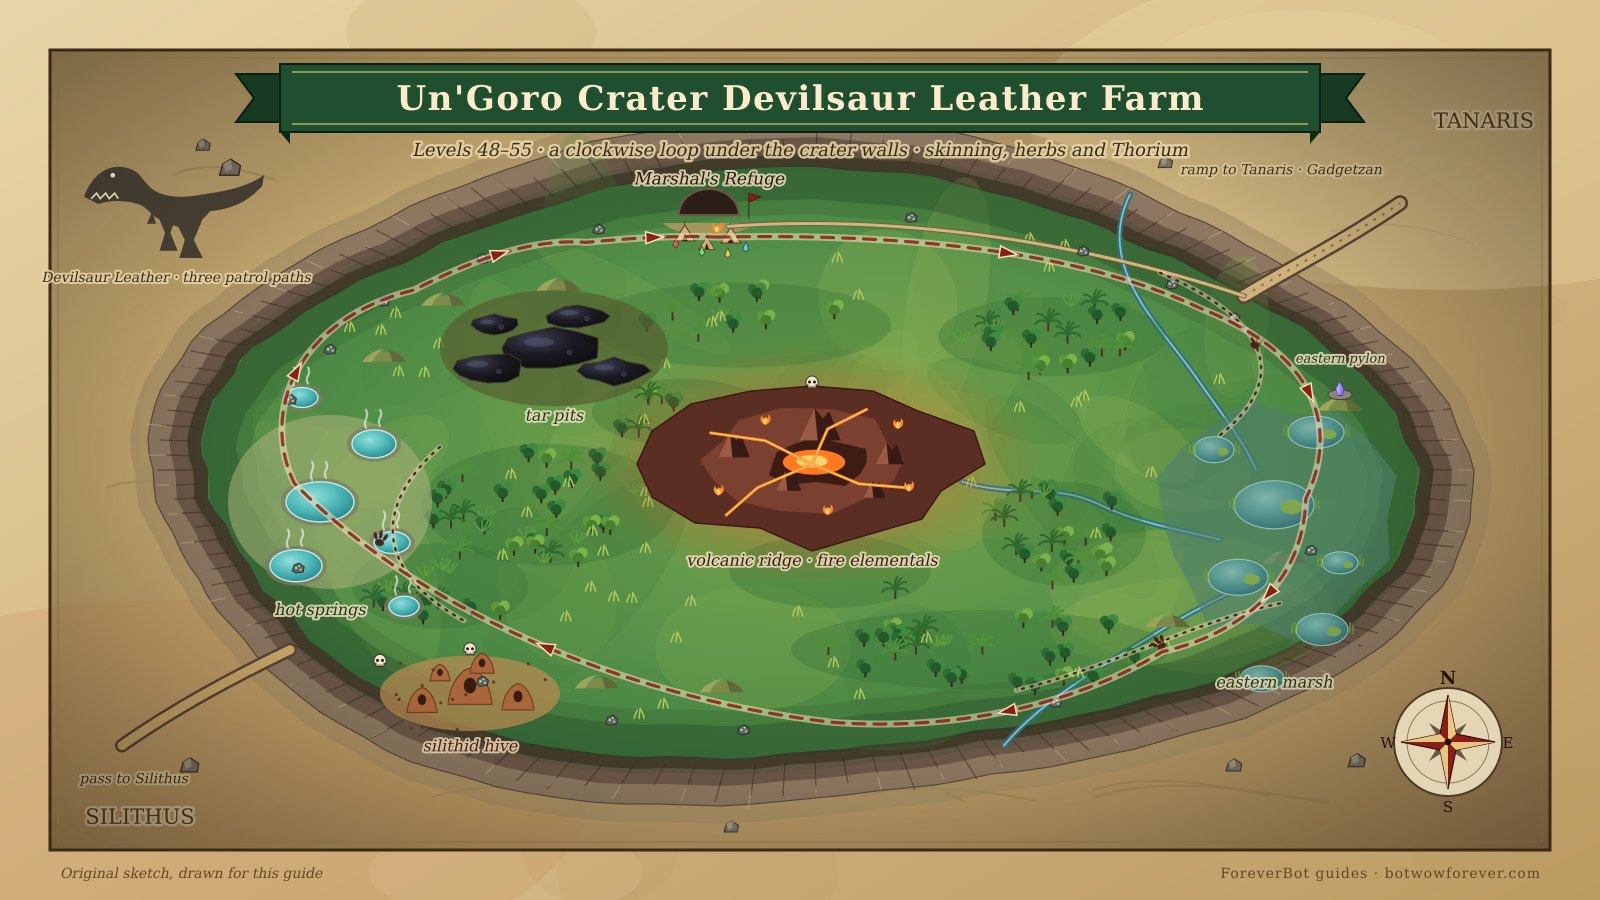
Un'Goro Crater is where a skinner finally meets the animal whose name sits on half the pre-raid wish lists in the game. Devilsaur Leather comes from exactly one family of beasts, only a handful of them walk the crater floor at any moment, and the leatherworkers who turn that leather into the famous leggings and gauntlets never have enough of it. This Un'Goro Crater devilsaur leather farm is a clockwise loop around the inside of the crater walls for levels 48 to 55 on vanilla-era realms such as WoW Forever. It works the stegodons, pterrordaxes and diemetradons that any character in the band can kill, shadows the three devilsaur patrol paths once you are strong enough to open them, picks Golden Sansam, Dreamfoil and Mountain Silversage along the way, and taps the Thorium veins that line the foot of the cliffs.
Where and what you need
The crater sits in southern Kalimdor and has two ways in: the long ramp down from Tanaris in the north-east corner, and the pass from Silithus in the south-west. The whole floor is level 48 to 55. The lesser dinosaurs, gorillas, tar beasts and ravasaurs run 48 to 54, the pterrordaxes circle at 50 to 54, and the devilsaurs sit at the very top of the band, roughly 54 to 57, not elite but hitting like it. Below 52, treat them as scenery: farm around them and let them walk past. From 54 or 55 a well-geared character takes one alone with cooldowns up and full health, and at 60 they become routine.
Skinning is the reason to be here. The rule of thumb is five times the mob's level, so stegodons and pterrordaxes want roughly 245 to 270 skill and a devilsaur 275 to 285. Arrive with Artisan Skinning at 275 and the loop carries you to the 300 cap; if you are still under 250, the Stranglethorn Vale skinning route gets you there faster than failing skins here. Herbalism is the natural second profession: Sungrass and Golden Sansam grow in the open grass, Dreamfoil at the edge of the eastern marsh, Mountain Silversage on the raised ground under the walls, all of it in the 230 to 280 skill band. Mining is the alternative, because the cliff foot is lined with Thorium: small veins at about 245 mining, rich ones at 275, with Mithril and Truesilver in between.
Bring the best weapon a dungeon run has given you, a stack of bandages and real food; the devilsaurs are a health check and the pterrordaxes come in pairs. Bag space is the true limit. A lap produces Thick and Rugged Leather, hides, ore, herbs, grey junk and greens, so four large bags are the minimum and a herb pouch pays for itself in a day. There is no auction house and no flight master inside the crater. The expedition camp at Marshal's Refuge, tucked into the northern wall, sells, repairs and gives quests; the neutral auction house in Gadgetzan is up the ramp in Tanaris.
The route
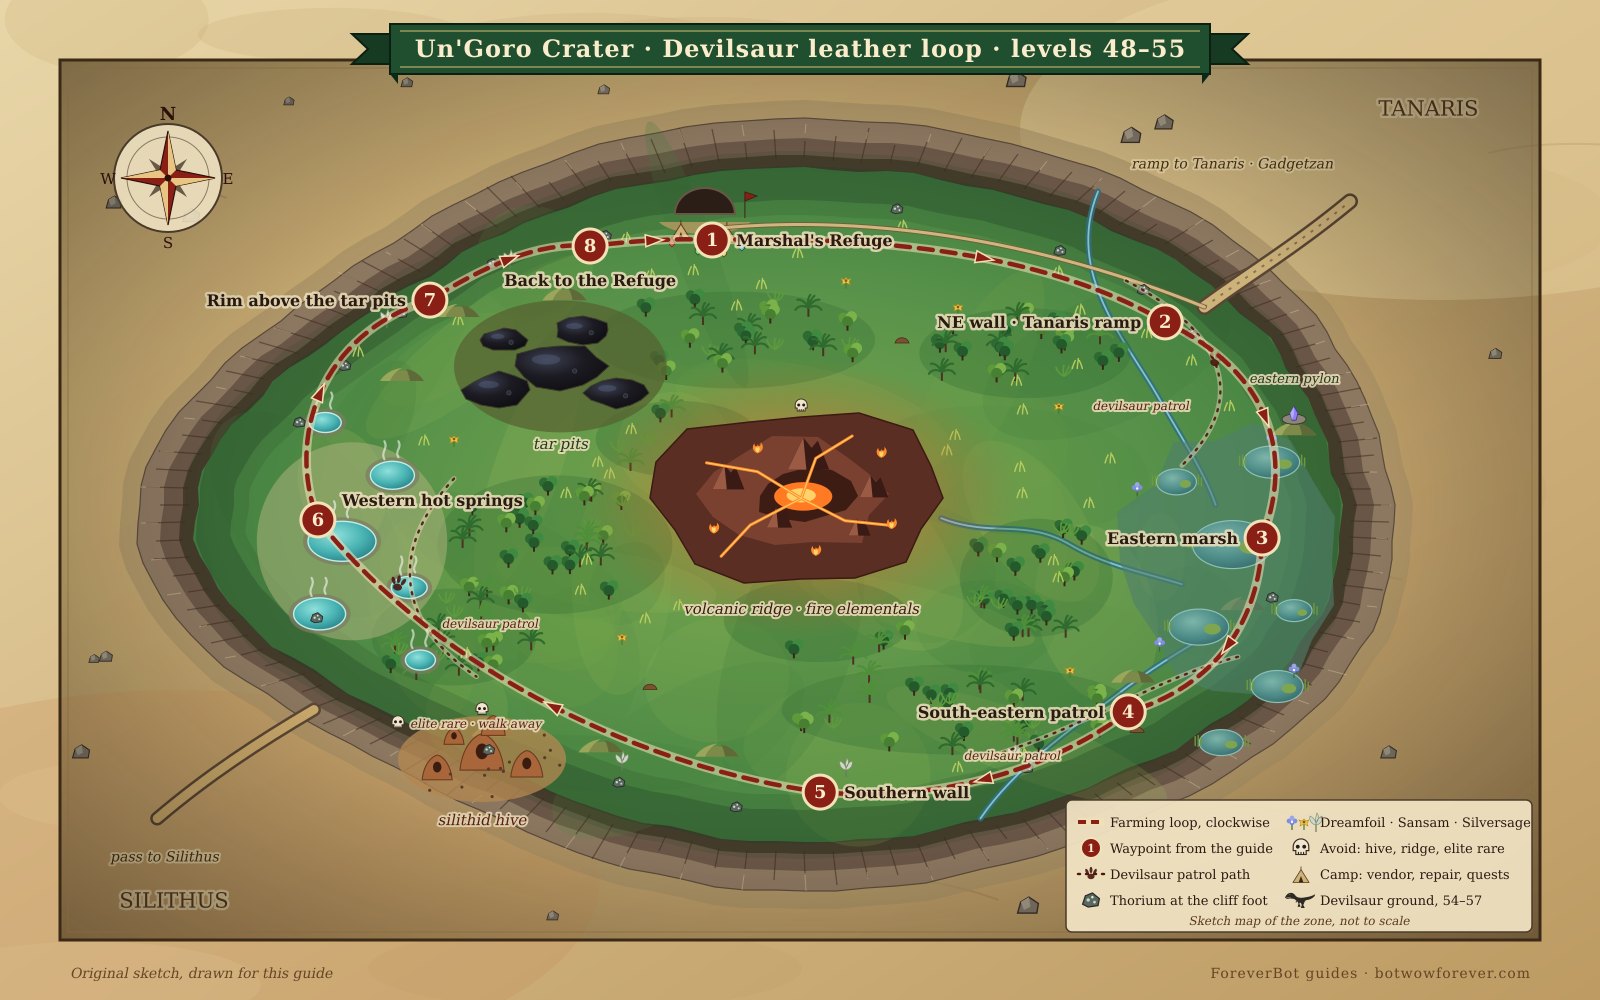
The loop runs clockwise around the crater floor with the cliff wall always on your left, and it never crosses the middle. Start at Marshal's Refuge; characters arriving from Tanaris join at waypoint 2 and walk the loop from there.
- Marshal's Refuge. Repair, empty your bags and set your Hearthstone here if you plan more than one session. Pick up any power crystals lying around the camp and finish the short pylon quest chain the expedition offers, because the buffs matter later. Leave the camp heading east along the foot of the northern wall.
- The north-eastern wall and the Tanaris ramp. Thorium veins sit in the rocks under the cliff and stegodons graze on the grass below them, with Sungrass and Golden Sansam in between. The first devilsaur patrol walks this stretch between the ramp and the marsh; its path is long and it comes back round every few minutes, so note where you meet it and keep skinning stegodons while you wait.
- The eastern marsh. South of the ramp the ground turns to shallow water. Dreamfoil grows at the water's edge and diemetradons wade between the pools alongside more stegodons. Fight on the dry islands rather than in the water, where a second diemetradon can join unseen, and spend any crystals at the eastern pylon on the rise.
- The south-eastern patrol. Where the marsh dries out toward the southern wall, the second devilsaur path runs. Shadow it along the cliff, taking stegodons and the odd pterrordax while it is away, and keep well north of the silithid hive further south-west; the swarm around it is nothing a skinner wants.
- The southern wall. Skirt the hive on its northern side and follow the cliff west. Mountain Silversage grows on the raised ground against the rock, and the Thorium here is as dense as anywhere in the zone. Ravasaurs hunt the southern run in packs; pull them one at a time at range or give them the road.
- The western hot springs. The steaming pools in the west are ringed by pterrordaxes and stegodons, the thickest Rugged Leather in the crater. The third devilsaur patrol crosses this ground, and so does the elite king of the devilsaurs, a rare you walk away from unless you brought a group.
- The rim above the tar pits. Keep to the high ground between the tar pits and the north-western wall. The tar beasts below slow you and skin into nothing worth the time, while the rocks above them hold more Thorium than any other stretch of the loop.
- Back to the Refuge. The wall curves east and brings you home. Sell, repair and start the next lap. Every third or fourth lap, climb the ramp to Gadgetzan and post the leather, herbs and ore on the neutral auction house.
What you get
| Source | Drops and nodes | Why it sells |
|---|---|---|
| Devilsaurs (three patrol paths) | Devilsaur Leather, Rugged Leather, green world drops | The only source of the leather for the pre-raid Devilsaur set; a pair of leggings eats well over a dozen pieces, so leatherworkers pay several gold each |
| Stegodons and diemetradons | Thick and Rugged Leather, Rugged Hide, meat | Rugged Leather is the base of every 250-plus leatherworking recipe, and Rugged Hide is rare enough to climb in price |
| Pterrordaxes | Rugged Leather, grey claws and wings | They die quickly in pairs and keep the leather coming between patrols |
| Open grass | Sungrass, Golden Sansam | Golden Sansam goes into Major Healing Potions, which every raid buys by the stack |
| Eastern marsh | Dreamfoil | Major Mana Potions and several raid elixirs; one of the most traded herbs at 60 |
| Raised ground under the walls | Mountain Silversage | Elixir of the Mongoose and flasks; demand never drops |
| Cliff foot all the way round | Thorium veins, Mithril, Truesilver, gems | Thorium feeds every 300-level blacksmith and engineer; see the Thorium mining route for the smelting side |
| Everywhere | Power crystals, Un'Goro Soil, grey junk | Crystals buy pylon buffs, soil is a repeatable turn-in in the capitals, and greys add up over a long session |
Gold per hour
Be honest with yourself about the numbers. Running the loop at 48 to 53 without touching the devilsaurs, skinning stegodons and pterrordaxes and picking what grows along the walls, you can expect roughly 10 to 20 gold an hour, most of it from Rugged Leather and Dreamfoil. From 55 upward, with all three patrols open and uncontested, roughly 25 to 45 gold an hour is realistic on a populated realm, and the Devilsaur Leather alone is usually more than half of that. When another skinner is sitting on the patrols, cut the figure in half and stop expecting any leather at all until they leave.
What moves those numbers more than anything is competition. On busy realms organised groups claim the three patrol paths for hours at a time, and on PvP realms the other faction has every reason to make the walk unpleasant. The auction house price of Devilsaur Leather swings with how many leatherworkers are chasing the set that month, Dreamfoil follows the raid calendar, and Thorium holds steady. Your skinning skill counts too, because a failed skin on a devilsaur is the single most expensive mistake in the zone, and so does the walk to Gadgetzan, which eats a quarter of an hour each way if you do it more often than you need to.
Tips
- Loot before you skin, every time. A skinned corpse is gone, and a green from a devilsaur is worth more than the leather.
- Learn the patrol timing. Each path carries one devilsaur at a time, the replacement takes a while to appear after a kill, and the time in between is exactly what the stegodons and pterrordaxes are for.
- Use the pylons. Once the quest chain at the Refuge is done, the right pair of crystals gives a buff that makes the difference on a devilsaur pull.
- Fight with your back to the wall. Pterrordaxes arrive in pairs and path strangely, and a second one from behind turns a clean kill into a corpse run.
- Never cut through the centre. The volcanic ridge in the middle is full of fire elementals, and the south holds a silithid hive; the loop goes round both for a reason.
- Carry a stack of Un'Goro Soil from the dirt piles you pass; the repeatable turn-in in Darnassus or Thunder Bluff is a nice bonus on top of the leather.
- If the patrols are claimed, do not fight for them. Farm the lesser dinosaurs for Rugged Leather, or come back at an off-peak hour when the paths are empty.
Running it with ForeverBot
The whole loop lives in the Farming section. Walk it once with Record loop to lay down the waypoints around the rim, then fill the Targets list with the beasts you actually want: stegodons, diemetradons and pterrordaxes from the start, devilsaurs only when your level and skinning are ready, using the + Current target button when one walks past. Leave ravasaurs, tar beasts, silithid and the elite king off the list and the bot never picks them, even when they wander into range. Tick Auto loot, Sell gray items and Go to a vendor when bags are full, and keep Repair at vendors and Buy food and water on so a long session does not end with a broken weapon and empty food. The status panel in the same tab shows Kills, Gold, Gold/hour and the current Loop point, which is the honest number to compare against the estimates above.
The gathering half sits under Professions, where the Skinning, Herbalism and Mining bars show how far you are from the next band, Skip nodes above your skill stops the bot from attempting devilsaur skins or rich Thorium it cannot finish, and Remember nodes keeps the Dreamfoil and Thorium spots in the loop for the next lap. In Settings, set the Navigator's Route mode to safest so the arrow keeps away from the hive and the central ridge, and give the Arrival radius a little slack for the slopes under the walls. The Eat below HP and Drink below mana sliders in the Leveling section's Combat and rest group apply here as well, and a character pulling devilsaurs wants both set higher than one farming stegodons; the Food/water stock slider under Macros and gear keeps enough on hand for a full lap. Plans and the one-month option are on the pricing page.
FAQ
What skinning skill do I need for devilsaurs?
Roughly five times the mob's level, which puts the devilsaurs at 275 to 285 depending on which one you meet. Come in at 275 and expect a few failures on the biggest ones until the loop pushes you to 300; every failed skin is a leather you do not get, so train Artisan Skinning before you make the trip.
Can I farm Un'Goro at level 48?
Yes, as long as you treat the devilsaurs as something to walk around rather than kill. At 48 to 52 the loop is a Rugged Leather, herb and Thorium run with stegodons and pterrordaxes as the targets, and it pays comfortably; the devilsaur half of the farm opens at 54 or 55 and gets easy at 60.
Where do I sell Devilsaur Leather?
Not in the crater, because there is no auction house inside the walls. Carry it up the ramp to the neutral auction house in Gadgetzan, where both factions buy, and post full stacks in the evening when leatherworkers are online; undercutting a little beats sitting on a stack for three days.
Want the farming done for you? Get ForeverBot